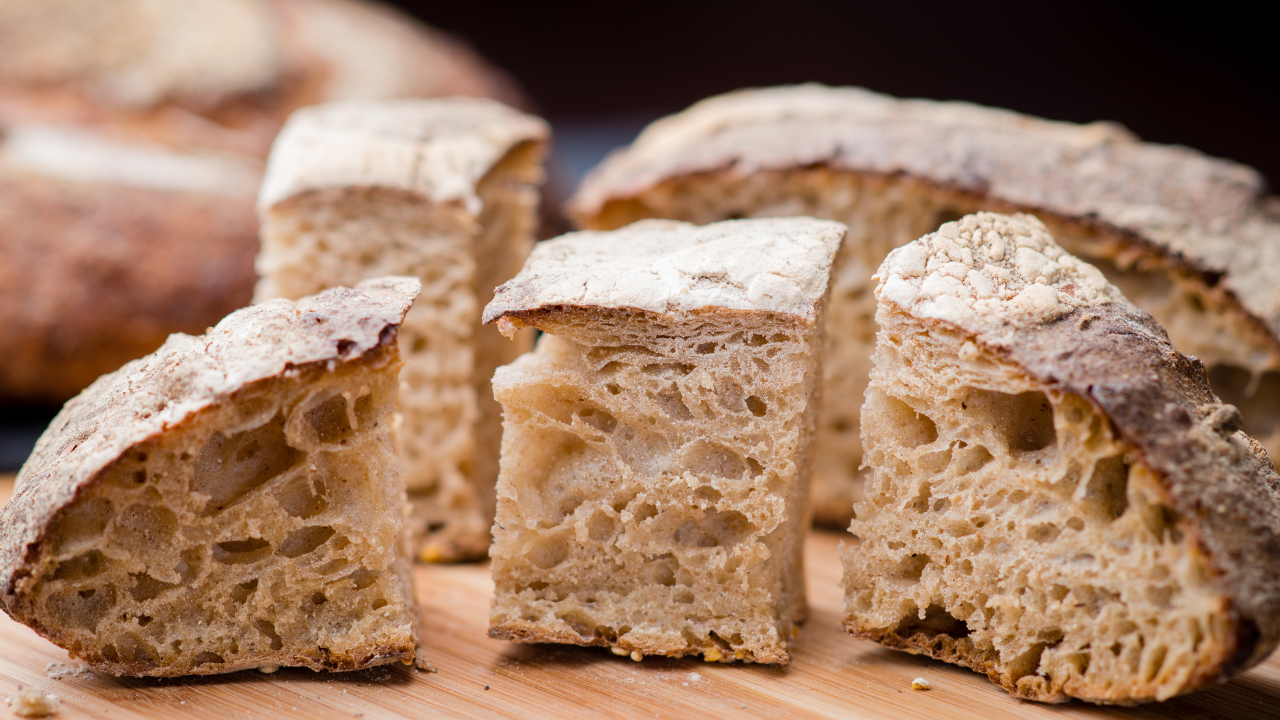
Sourdough is a type of bread that is leavened naturally through the fermentation of wild yeast and lactic acid bacteria. The characteristic sour flavour and chewy texture of sourdough bread come from this natural fermentation process. I have been making sourdough for nearly four years. I love the process and find it almost meditative. Sour dough is delicious, its healthy and its so much cheaper to make your own at home. Why not join me on my sour dough journey.
To enjoy sough dough at home, we first need to make our starter.
SOUR DOUGH STARTER
INGREDIENTS
FLOUR
You can make a sourdough starter with various types of flour, but the most common choices are unbleached plain flour, whole wheat flour, rye flour or a mixture of flours. The type of flour you use can influence the flavour, texture, and speed at which your starter matures. Here’s a breakdown of these options:
- Plain Unbleached Flour: Plain unbleached flour is a versatile choice for making a sourdough starter. It contains a moderate amount of protein and works well for cultivating the wild yeast and bacteria necessary for fermentation. Starters made with all-purpose flour tend to have a milder flavour and a lighter texture.
- Whole Wheat Flour: Whole wheat flour contains the bran and germ of the wheat grain, which provide additional nutrients and microorganisms that can help your starter thrive. Starters made with whole wheat flour often have a heartier, more robust flavour and may mature more quickly than those made with all-purpose flour.
- Rye Flour: Rye flour is a popular choice for making sourdough starters because it contains a higher level of nutrients and natural microorganisms compared to some other flours. Sourdough starters made with rye flour tend to develop a robust and distinctive flavour profile and mature more quickly.
- Mixed Flour: Many cooks choose to create a starter by combining different types of flour, such as a mixture of plain unbleached flour and whole wheat or rye flour. This can provide a balanced combination of nutrients and flavours.
WATER
When making a sourdough starter, the type of water you use can influence the success of your starter. Here are some considerations for the type of water to use:
- Filtered Water: Using filtered water is a good choice because it removes impurities, including chlorine and chloramines, which can inhibit the growth of beneficial microorganisms in your starter. These chemicals are often added to tap water to make it safe for drinking.
- Dechlorinated Water: If you don’t have access to filtered water, you can dechlorinate tap water by letting it sit uncovered in an open container for several hours. Chlorine will naturally dissipate from the water over time.
- Spring Water: Some bakers prefer to use spring water, which is naturally mineral-rich and can add unique flavours to the starter. However, be aware that the mineral content in spring water can vary, and it may not always be consistent.
- Room Temperature Water: Use room temperature or slightly warm water when feeding your starter. Very cold water can slow down the fermentation process, while very hot water can kill the microorganisms in the starter.
- Consistency: Whatever type of water you choose, it’s essential to maintain consistency in your sourdough starter care. Use the same type of water consistently to minimize variations in the starter’s behaviour.
Remember that the microorganisms in your sourdough starter are sensitive to the environment, including the water you use. Using clean, dechlorinated, and consistent water will help create a stable environment for your starter to thrive. It’s one of the factors that can contribute to the success of your sourdough baking journey.
MAKING YOUR STARTER
Day One – Starter

Day Two – Starter

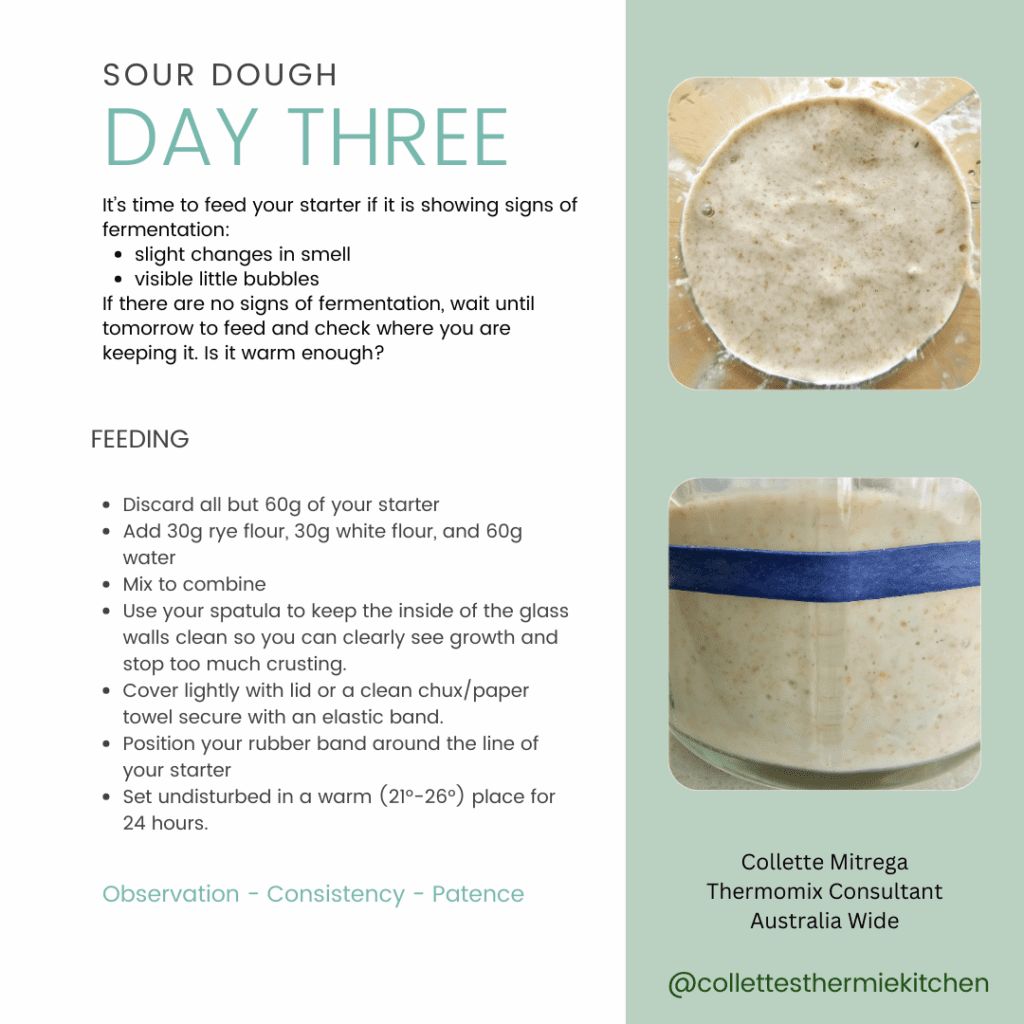
Day Three – Starter
Day Four – Starter

Day Five – Starter
Today is a repeat of day four! We are building and maturing our starter. Here are my photos.

Today, ‘Lucy’ is active and smelling lovely. I have decided to to create a second starter with the discard and continue on to make a second. I will pop this one in a different environment and see what happens. If I end up with two, I can gift one or make pancakes!
Still no activity?
Check, temperature of the environment you keep you starter throughout the day. If its cold wrap it in something warm, tea towel, sock or pop it in the oven or microwave with the light on. and door ajar slightly. Feed it twice a day to try and generate activity.
Activity visible
Continue feeding and observation routines.
Very active:
consider feeding with all white flour – 60g.
Day Six – Starter
Continue to feed and mature!

DAY SEVEN
So mine is now into a routine. I am feeding once a day with half white and half rye flour. It is taking about 9 hours to double in size after feeding which is good, its cold here! How long is yours taking to rise? Don’t worry if its not regular or super active …. keep going!
So keep going, I think you know what to do now. Feed daily. If sluggish, feed 2x a day and keep it in the perfect temp zone.
Remember Observation, consistency and patience!

Summary – developing your starter
The time it takes for a sourdough starter to mature can vary depending on several factors, including temperature, feeding schedule, and the specific flour used. Generally, it takes about 5 to 7 days for a sourdough starter to reach a point where it is considered mature and ready to use for baking. However, it can take up to 14 days in some cases.
Here’s a general timeline for the maturation process of a sourdough starter:
- Days 1-2: In the initial days, you’ll mix equal parts of flour and water to create a thick paste. This mixture is left at room temperature, loosely covered, to capture wild yeast and bacteria from the environment.
- Days 3-4: You should start to see some activity in the starter by this point. It may begin to bubble and rise slightly. Continue with daily feedings, discarding a portion of the starter and adding fresh flour and water.
- Days 5-7: By this stage, the starter should be more active, with more bubbles and a noticeable increase in volume after each feeding. It should also have a tangy, sour aroma.
- Keep in mind that the exact time it takes for a starter to mature can vary. Factors like the temperature of your environment (warmer temperatures accelerate the process), the type of flour used (rye flour can speed up fermentation), and the specific wild yeast and bacteria present in your location can all influence the timeline. It’s essential to be patient and let the starter develop its full flavour and strength before using it for baking.
To maintain a mature sourdough starter, you’ll need to continue regular feedings (usually once a day or every 12 hours) and keep it at a consistent temperature (ideally around 21-28°C) to ensure it remains healthy and active. You can also pop it in the fridge if not using for a while, (see notes below).
Signs of a mature starter
A mature sourdough starter should exhibit several characteristics that indicate it’s ready for baking.
- Rise and Fall: A mature starter will rise and double or even triple in volume within a few hours after a feeding. This is a sign that the wild yeast in the starter is strong and active.
- Bubbling: You should see a network of bubbles throughout the starter. These bubbles are a sign of carbon dioxide production, which occurs during fermentation and indicates yeast activity.
- Tangy Aroma: A mature starter will have a pleasant, slightly tangy aroma. It should smell sour and acidic but not overly pungent or unpleasant. The aroma may also have fruity or nutty notes.
- Consistent Feeding Schedule: A mature starter should maintain its activity between feedings. If you feed your starter regularly (usually once a day or every 12 hours) and it consistently rises and falls predictably, it’s a good sign of maturity.
- Stable pH Level: Over time, a mature starter will develop a stable pH level, which contributes to its sour flavour. This stable acidity helps improve the structure and flavour of your sourdough bread.
- Float Test: A mature starter should float when dropped into a glass of water. This is a simple test to check if your starter is ready to leaven bread. If it floats, it indicates that there are enough gas-producing bacteria and yeast to leaven a loaf of bread effectively.
- Consistency: The texture of a mature starter should be consistent. It should be elastic and stretchy, with a smooth surface. There should be no separation of liquid or any mould growth.
- Predictable Rise Time: When you feed your mature starter, you should be able to predict how long it will take to reach its peak rise. This predictability is essential for planning your bread-making process.
Remember that the time it takes for a starter to mature and exhibit these signs can vary depending on factors like temperature, feeding schedule, and the type of flour used. It’s important to be patient and allow your starter to develop fully before relying on it for consistent and flavourful sourdough bread baking.

CONSISTENCY ….. OBSERVATION … PATIENCE
PROBLEMS!
Here are some common problems people encounter when creating and maintaining a sourdough starter:
- Slow Starter Development: One of the most common issues is a starter that doesn’t seem to show signs of fermentation (bubbling, rising) within the expected timeframe. This can be due to various factors like temperature, flour type, or water quality.
- Inconsistent Rise: Your starter might rise and fall inconsistently during feedings, which can be frustrating. This could result from irregular feeding or improper storage conditions.
- Foul Odours: If your starter develops a strong, unpleasant odour (like rotten or spoiled), it may indicate the presence of harmful bacteria or yeast. This could be due to contaminated utensils or water.
- Mould Growth: Mould growth on the surface of the starter is a clear sign of contamination. It’s essential to discard the mouldy portion and start fresh.
- Excessive Hooch (Liquid on Top): While a layer of liquid (hooch) on top of your starter is normal and can be stirred back into the mixture, excessive hooch can indicate that your starter is hungry and needs more frequent feedings.
- Starter Too Thick or Thin: Achieving the right consistency for your starter can be a challenge. If it’s too thick, it may not ferment properly, and if it’s too thin, it may not hold bubbles.
- Inconsistent Results in Baking: A mature starter should reliably leaven bread, but if it doesn’t, it could be due to factors like underfeeding, using the starter before it’s fully active, or not letting the dough ferment long enough.
- Overfermentation: Leaving your starter unattended for too long between feedings can lead to overfermentation, resulting in a starter that’s too sour and potentially unhealthy.
- Chlorinated Water: Tap water with chlorine or chloramine can inhibit the growth of the beneficial microbes in your starter. Using filtered, dechlorinated or spring water is recommended.
- Incorrect Flour Choice: Some flours can be less suitable for starter development. Rye and whole grain flours, for instance, contain more nutrients and can lead to faster starter growth, while all-purpose flours may require more patience. Try a mix of half white and half rye to give your starter a boost.
- Inconsistent Feeding Schedule: Maintaining a consistent feeding schedule is crucial. Irregular feedings can result in a weak and less reliable starter.
- High or Low Temperature: Extreme temperatures can hinder starter development. Too cold, and the yeast may become dormant; too hot, and it might develop undesirable off-flavours.
- Cross-Contamination: Using utensils or containers that aren’t properly cleaned or sanitized can introduce unwanted microorganisms into your starter.
- Using Metal Utensils: Some people believe that metal utensils can negatively affect the starter due to a reaction with the acids produced during fermentation. It’s best to use glass, plastic, or wooden utensils.
- Inadequate Patience: Developing a mature starter can take time, sometimes weeks. Impatience can lead to starting over or using a starter that’s not fully active.
MANAGING YOUR STARTER
Refrigerating a sourdough starter between bakes is a common practice to slow down its activity and reduce the need for daily feedings. Here’s how to refrigerate your starter:
- Feed the Starter: Before refrigerating your starter, make sure it’s healthy and active. Feed it with the usual flour and water ratio, ensuring it’s at its peak activity.
- Choose a Container: Select a clean, airtight container for your starter. A glass jar or plastic container with a tight-fitting lid works well. Make sure the container has some room for the starter to expand a little.
- Transfer to the Container: Transfer your fed starter into the container. Seal the lid tightly to prevent air from entering or escaping.
- Mark the Time and Date: Use a label or a piece of tape to mark the current date and time on the container. This will help you keep track of how long it has been in the refrigerator.
- Store in the Refrigerator: Place the container with the starter in the refrigerator. The lower temperature will slow down the fermentation process, and the starter will require less frequent feeding.
- Feeding Schedule: While refrigerated, you can typically get away with feeding your starter once a week or even once every two weeks, depending on its activity level and your schedule. A weekly feeding is a good starting point.
- Removing Starter for Baking: When you’re ready to bake, take the starter out of the refrigerator a day or two before you plan to use it. Allow it to come to room temperature and feed it with fresh flour and water to reactivate it. Follow your recipe’s instructions for the specific amount and feeding ratio needed for your bake.
- Maintain Regular Feedings: After using a portion of your starter for baking, remember to feed the remaining starter to maintain its health and activity. It may take a few feedings at room temperature to get it back to its peak strength. You will soon get to know your personal starters routine and timings.
- Watch for Signs: Keep an eye on your starter for any changes in smell, color, or activity. If it develops any off-putting characteristics, consider discarding some and refreshing it with fresh flour and water.
By refrigerating your starter between bakes and following a regular feeding schedule, you can keep it healthy and ready for your next baking adventure without the need for daily care.

SOURDOUGH DISCARD
Sourdough discard refers to a portion of a sourdough starter that is removed and discarded during the feeding process. When you maintain a sourdough starter, you typically need to feed it regularly by adding fresh flour and water. During this process, a portion of the existing starter is removed before feeding to make room for the new flour and water mixture.
The reason for discarding a portion of the starter is to maintain the overall balance of microorganisms in the culture. Over time, without discarding, the starter would accumulate too much acidity and waste products, which can affect its performance and flavour.
Rather than throwing away the discard, many bakers save it to use in other recipes. Sourdough discard can be used in various ways, such as:
- Pancakes and Waffles: Sourdough discard can be added to pancake or waffle batter to give it a tangy flavour and a slight leavening boost.
- Muffins and Quick Breads: Incorporate discard into recipes for muffins, biscuits, or quick breads for added flavour and moisture.
- Crackers: Sourdough discard can be used to make sourdough crackers by combining it with flour, oil, and seasonings.
- Pizza Dough: You can use discard in pizza dough recipes for a unique flavour.
- Fried Foods: Some recipes use sourdough discard as a component in batters for fried foods like chicken or vegetables.
Remember that the sourdough discard will have a distinct sour flavour due to the fermentation process, which can be a desirable characteristic in many recipes. However, the strength of the sourness will depend on the maturity of your starter and how long the discard has been sitting. It’s a great way to minimize waste and explore different culinary creations while maintaining your sourdough starter.
Sourdough discard is an organic material and can be composted. It will break down naturally in a compost pile or bin. Ensure that your composting system can handle flour-based products, which should generally be okay in a well-balanced compost pile.
Another way to use it up is to gift it with instructions as a sour dough starter!
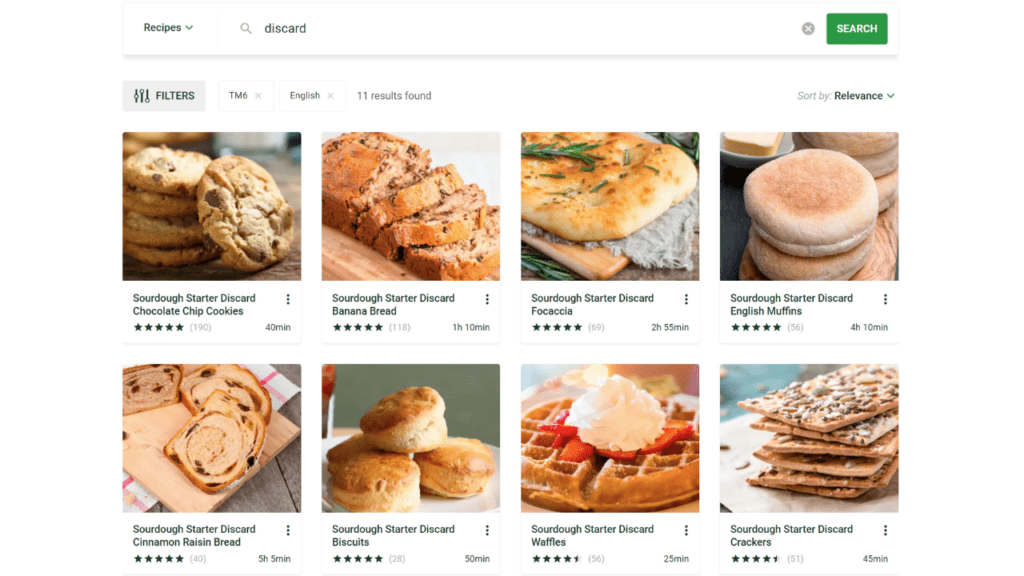
Search ‘sourdough discard’ on Cookidoo for some fab recipes!
Accumulate your discard
You can accumulate sourdough discard over time if you don’t want to use it immediately in recipes. Accumulating discard can be a convenient way to have a larger quantity on hand for future baking projects or to share with others.
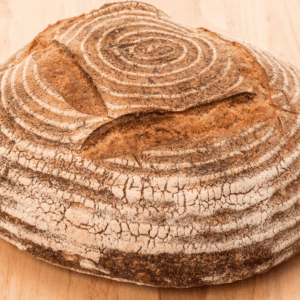
FIRST SOUR DOUGH LOAF
When you starter has matured; its regular, rises well and is active after a feed, you are ready to bake your first loaf. This is an easy recipe to get you started. You will find a few many more on Cookidoo.
When is the best time to bake?
The best time to bake with your sourdough starter depends on several factors.
- Starter Activity: The ideal time to bake with your sourdough starter is when it’s at its peak of activity. This is usually a few hours after you’ve fed it and it has doubled in size. Look for a starter that is bubbly and has a slightly domed or peaked appearance.
- Smell: The starter should have a pleasant, slightly tangy aroma. It should not smell overly sour or unpleasant.
- Time Availability: Consider your schedule. If you’re baking bread, you’ll need to plan ahead, as sourdough bread recipes often involve long fermentation periods. If you have a regular feeding schedule for your starter, you can plan your baking around it.
- Temperature: The temperature of your kitchen can affect the fermentation speed of your starter and dough. Cooler temperatures will result in slower fermentation, while warmer temperatures will speed it up. You can adjust your baking schedule to accommodate temperature variations.
- Dough Development: For bread, you want to use your starter when it’s at its peak to ensure optimal dough development and rise.
- Experimentation: As you become more experienced with sourdough baking, you may want to experiment with using your starter at different stages of fermentation to achieve different flavours and textures in your bread. There are a host of cooking projects that you can use your starter in too.

Keep in mind that sourdough baking often involves some trial and error to find the timing that works best for your specific starter and preferences. Over time, you’ll develop a better sense of when your starter is ready for baking to produce delicious, flavourful bread and other sourdough treats.
STAGES
In the recipe on this page, I have kept things simple and missed out a few stages such as autolyse. It will give you a beautiful loaf and won’t be too hydrated and sticky to work worth. For your fist loaf, give this one a go. A video below will take you through it and here, in summary are the basic steps.
PREMIX: Add ingredients and mix in the Thermomix, then knead for 4 minutes.

FIRST SHAPE: Stretch and fold to form a circle.

BULK FERMENTATION: Done at room temperature. The dough should double in size, usually done in 3-4 hours but it may take longer if its cold.

SHAPING: Gentle shaping of the risen dough and formation of a tight skin. Placing into a prepared banneton for the second rise. This can be done at room temp or in the fridge.

PREPARING TO BAKE: Tipping out of Banneton , scoring and baking.

ENJOYING: Let it cool for a few hours for the crumb to dry before cutting into it.
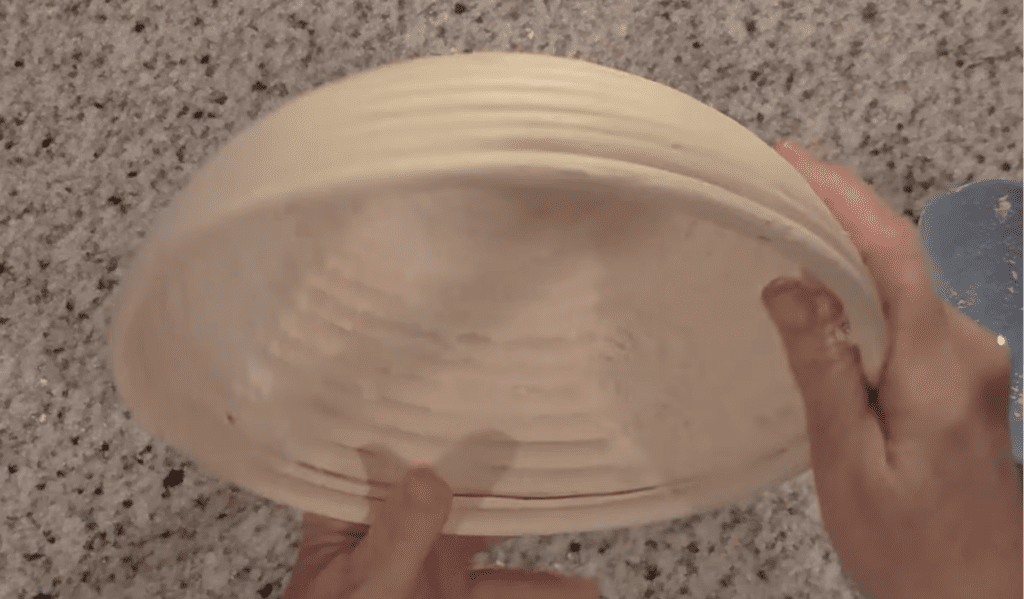
USING A BANNETON
Preparing a banneton (also known as a proofing basket) for baking is an important step when making sourdough. Bannetons are used to support the dough during the final proofing stage and create a beautiful pattern on the bread’s crust. If you don’t have one, you can use a bowl and a tea towel that is well dusted in flour.
Here’s how to prepare a banneton for baking:
Materials you’ll need:
- Banneton (usually made of cane or wood pulp)
- Flour (rice flour or plain flour)
- Clean kitchen towel or liner (optional)
- Plastic wrap (optional)
Steps:
- Clean and Dry the Banneton:
- If it’s a new banneton, rinse it with water to remove any loose debris.
- Let it air dry thoroughly. Ensure there’s no moisture left, as this can encourage sticking.
- Dust with Flour:
- Lightly spray your new banneton with water and generously dust the interior with flour. Use either rice flour or all-purpose flour.
- The flour prevents the dough from sticking to the banneton and adds a nice texture to the crust.
- Spread Flour Evenly:
- Turn the banneton on its side to evenly distribute the flour across the surface and sides of the banneton.
- Make sure there are no thick clumps of flour as this can create an uneven coating on the dough.
- Shake Off Excess Flour:
- Turn the banneton upside down and gently tap it to shake off any excess flour.
- You want a thin, even layer of flour to prevent sticking but not so much that it creates a thick layer on your bread.
- Optional Liner or Towel:
- Some bakers like to line the banneton with a clean kitchen towel or a banneton liner (made of linen or cotton fabric) before dusting with flour. This can help prevent sticking and make it easier to remove the dough.
- If using a liner, dust it with flour as well.
- Shape Your Dough:
- Once the banneton is prepared, place your shaped dough inside, seam side up. This ensures a smooth surface for your bread.
- Cover or Wrap (Optional):
- You can cover the banneton with plastic wrap or place it inside a plastic bag to prevent the dough from drying out during the final rise.
- If you choose not to cover it, make sure to proof your dough in a humid environment to prevent it from forming a dry skin.
- Final Proofing:
- Allow your dough to undergo its final proofing (the second rise) in the banneton.
- Follow your recipe’s instructions for proofing time and temperature.
- Bake:
- When the dough has completed its final proofing, gently turn it out onto a baking sheet or into a Dutch oven and proceed with your baking instructions.
- Clean:
- Your banneton doesn’t need a deep clean every time you use it. You’ll want to make sure it’s completely dry before you store it to prevent mould and bacteria. Once a month, use a dry brush to brush out any excess flour, you may need to do this more frequently depending on how often it is used.
By properly preparing your banneton, you’ll help ensure that your bread comes out with an attractive pattern and easily releases from the basket without sticking.
BAKING IN A CAST IRON POT
Baking sourdough bread in a cast iron pot (Dutch oven) is a popular method that mimics the effects of a professional steam-injected oven, resulting in a beautifully crispy crust and a well-risen loaf. Here’s how to do it:
Ingredients:
- Sourdough bread dough (prepared and proofed)
- Parchment paper (optional)
- Water (for steaming)
Equipment:
- Cast iron Dutch oven with a lid
- Oven
Instructions:
- Preheat Your Oven:
- Place your Dutch oven in the oven and preheat it to a high temperature, typically around 230°C. Preheat for at least 30 minutes to ensure the pot is thoroughly heated.
- Shape Your Dough:
- While the oven is preheating, carefully remove your proofed sourdough dough from the banneton onto some baking paper sprinkled with a little semolina.
- Score the Dough:
- Using a lame or a razor blade, make a few shallow slashes or a decorative pattern on the surface of your dough. This allows the bread to expand during baking.
- Transfer the Dough to the Dutch Oven:
- Carefully take your baking paper with the dough and place into the preheated Dutch oven. Be cautious as the pot and lid will be extremely hot.
- Cover and Bake:
- Put the lid on the Dutch oven and place it back into the preheated oven.
- Bake with the lid on for about 20-30 minutes. The covered Dutch oven creates a steamy environment that helps the bread rise and develop a crisp crust.
- Uncover and Continue Baking:
- After the initial covered baking time, remove the lid and continue baking for another 15-30 minutes or until the bread reaches your desired level of crustiness and colour. This allows the bread to develop its characteristic crust.
- Cooling:
- Once the bread is baked to your satisfaction, carefully remove the Dutch oven from the oven using oven mitts.
- Lift the bread out of the pot and onto a wire rack to cool completely.
- Cool and Slice:
- Allow the bread to cool for at least 1-2 hours before slicing. This helps the crumb set and prevents it from becoming gummy.
Baking sourdough bread in a Dutch oven produces a wonderful crust and crumb texture. Experiment with different baking times and temperatures to achieve the crust and texture you prefer, as it can vary depending on your oven and dough recipe.
WATCH ME MAKE IT
Collettes Easy Sour Dough Loaf
Ingredients
- 230 grams water
- 400 grams bakers flour
- 5 grams salt
- 160 grams starter
- 1 tsp olive oil to oil bowl
- Extra flour when shaping
Instructions
- Please use this recipe in conjuction with the video above – https://www.youtube.com/watch?v=iyrP4GFKx9g video.
- Add water, flour, salt and starter to Thermomix Bowl and Mix 10 secs/speed 4. Then knead for 4 minutes using the Dough function.
- Tip dough onto a lightly floured board and stretch and fold the dough (see video) so you have a circle shape. Pop it into a lightly oiled glass bowl and Bulk ferment in a warm spot until approx double in size, (usually 3-4 hours).
- Use a bench scaper and gently tip dough onto board so the underside now faces up. Gently finger press and then gently shape into a circle using the stretch and fold and drag and pull method as demonstrated in the video.
- Place into a prepared banneton (see post notes on preparing your banneton) so that the top of the dough ball is now at the bottom. Cover and proof until nearly doubled.
- Add a small tray to the oven and preheat to 230℃ fan.
- Tip dough onto a baking sheet lined with semolina or flour.
- Deeply score loaf and pop into a hot oven; add a couple of cups of water into the small tray we put in earlier to create steam. Bake for 30 – 35 mins. Cool on a wire rack. After a few hours, cut and enjoy!