
Rissoles

Rissoles are like little balls of deliciousness that are made from minced meat, breadcrumbs, and spices.
Think of them as meatballs’ fun cousin who’s always up for a good time.
In Australia, they’re often served with mashed potatoes and gravy, which is the perfect combo for a cozy night in. In the UK, they’re often eaten with chips (fries) and a pint of beer, while in Ireland, they’re best enjoyed with a side of good old-fashioned craic (fun). So if you’re looking for a tasty and easy-to-make treat, rissoles are the way to go!
Mine, oh my. They are so yum!! When my boys come home for a visit they always ask for my meatballs with onion gravy and mashed potatoes. They never mention the green beans! Oh well, can’t have everything.
The great news is they are on the table in 20 mins with a Thermomix!
Tips for making delicious Rissoles
Here are some tips for making delicious rissoles:
- Use quality ingredients: The key to making great rissoles is to use high-quality meat, fresh breadcrumbs, and good quality spices. This will ensure that your rissoles are full of flavor and have a great texture.
- Fat: Make sure you have some fat in your meat. 20% fat to lean minced meat is great.
- Chill the mixture before shaping: It’s a good idea to chill the mixture for at least 30 minutes before shaping the rissoles. This will help the mixture to firm up, making it easier to shape and handle.
- Chill before cooking: Not always necessary but it does help the rissoles hold their shape. I usually make the patties in the morning and pop them in the fridge ready to cook for dinner.
- Keep the size consistent: Try to keep the size of the rissoles consistent so that they cook evenly. Use a tablespoon or an ice cream scoop to measure out the mixture, then shape it into patties.
- Cook them properly: You can cook rissoles by frying them in a little oil in a pan, by baking them in the oven or in an air fryer. Make sure to cook them on medium high heat, turning them occasionally until they are golden brown on all sides and cooked through.
- Let them rest: After cooking, let the rissoles rest for a few minutes before serving. This will help to ensure that the flavors have time to develop and that the rissoles are easier to handle.
With these tips, you should be able to make delicious and perfect rissoles every time!

Mix it up!
There are many flavors and seasonings that you can add to rissoles to make them taste great. Here are some ideas:
- Garlic and herbs: Adding minced garlic and chopped fresh herbs such as parsley, thyme, and rosemary can add a nice flavor to your rissoles.
- Cheese: You can add grated cheese to your rissoles mixture, such as cheddar or parmesan, which will add a nice flavor and help to keep the rissoles moist.
- Spices: You can add various spices to your rissoles, such as cumin, paprika, or chili powder to give them a little kick.
- Vegetables: You can add finely chopped vegetables such as onion, carrots, and celery to your mixture. This will add flavor, moisture and also make the rissoles more nutritious.
- Mustard: Adding a dollop of mustard to your mixture will give your rissoles a tangy kick.
- Worcestershire sauce: A splash of Worcestershire sauce will add a savory depth of flavor to your rissoles.
- Soy sauce: A splash of soy sauce will add a delicious umami flavor to your rissoles.
- Finally swap up the meat, use beef, chicken or pork mince. Beef is my fave but what will be yours?
Remember to experiment with different flavours and find the perfect mix that suits your taste!
Cooking
- Oven: Bake at 180C 9fan) for 25 minutes, depending on the size of the rissoles.
- Fry Pan: Fry in olive oil on medium high heat, 4 mins each side. Don’t fuss over them turn once and don’t press down on them.
- Air Fryer: Chill the shaped rissoles for 30 mins then spray the rissoles and air fryer basket with oil. Cook at 180°C for 10 minutes or until golden and cooked through.
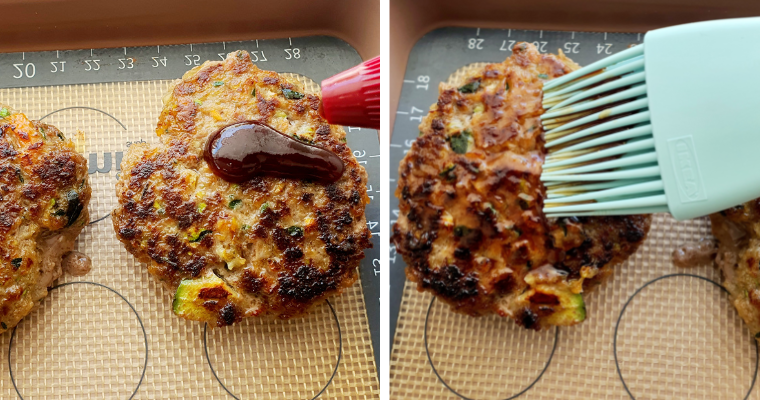
- Fry/Bake: A method I like to use. Fry and sear rissoles, medium hight heat, 2 mins on each side and pop onto a baking tray. Cook in a pre heated oven 180C (fan) for 6 minutes. Remove and brush generously with BBQ sauce and continue to cook for 3-4 mins until cooked through.
- Frozen rissoles can be cooked from frozen and will approx 5 mins each side, but check before eating.
Drizzle sauce
If you are not having gravy, its nice to drizzle them with a little sauce for extra flavour and moistness and serve them with a fresh green salad. One I often make involves whisking the following in a small bowl. It’s delicious and one of my basic dressings!
- 2 tbsp olive oil
- 1 tbsp lemon juice
- 2 tsp Dijon mustard
- 1 tbsp honey
- salt and pepper to season
Storage
The storage time for rissoles depends on how they are stored and cooked. Here are some general guidelines:
- Cooked rissoles that have been left at room temperature for more than two hours should be discarded.
- Cooked rissoles can be stored in the refrigerator for up to 3 days. Make sure to store them in an airtight container and place them in the refrigerator as soon as they have cooled down.
- Cooked rissoles can also be frozen for up to 2-3 months. Allow the rissoles to cool down, then place them in an airtight container or freezer bag and store them in the freezer.
- Raw rissoles that have not been cooked can be stored in the refrigerator for up to 1-2 days. Make sure to store them in an airtight container and place them in the refrigerator as soon as they have been prepared. They can also be frozen for up to 2-3 months.
Always make sure to follow proper food safety guidelines and use your best judgement when deciding if rissoles are still good to eat. If they look or smell off or if there is any doubt about their safety, it’s best to err on the side of caution and discard them.
Watch me make them in this short video

Rissoles
Equipment
- TM5 or TM6
Ingredients
- 1 onion quartered
- 1 clove garlic peeled
- handful parsley
- 1 small zucchini chopped into 2cm pieces
- 1 small carrot chopped into 2cm pieces
- 50 g panko breadcrumbs
- 500 grams minced beef
- 1 tsp Italian spice mix or mixed herbs
- 1 tbsp Worcestershire sauce
- 1 egg large
- 2 tbsp BBQ sauce
Instructions
- Add onion, garlic and parsley to Thermomix bowl and chop 3 secs/speed 6. Scrape down bowl and repeat 3 times until you have a very finely chopped onion.
- Add zucchini and carrot. Chop 4 seconds/speed 6. Remove any large pieces of veg.
- Add remaining ingredients and combine 10 secs/speed 4.
- Use a large ice cream (about 1/4 cup) to shape into rissoles and press your thumb into each one to make an indentation.
- Chill for 30 mins. Sprinkle on extra salt. Add 2 tbsp olive oil in a fry pan over medium high heat and fry rissoles in batches. Fry for 4 mins each side. Don't fuss with them, don't press them down.
- OR after chilling, fry on medium high heat for 2 mins each side, and transfer to a hot (200°) oven for 6 mins. Remove and brush with BBQ sauce and return to oven for 3- 4 mins until cooked through.
Notes
- See notes and tips in blog