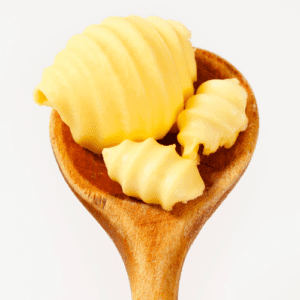
Cultured Butter

Cultured butter, sometimes referred to as European-style butter, is a type of butter that is made from cream that has been fermented with beneficial bacteria before churning. This fermentation process gives cultured butter its distinct flavour, texture, and aroma.
It has a richer and more complex flavour compared to regular butter. It typically has a slightly tangy or nutty taste due to the fermentation process. The texture of cultured butter is also creamier and more spreadable when compared to standard butter. Additionally, because it has less moisture (due to the washing step), it tends to have a higher fat content, which can contribute to its luxurious mouthfeel.
I adore it slathered on toasted sourdough but it can be used wherever butter is called for.
Ingredients
To make cultured butter, you’ll need the following ingredients:
- Thickened or Pure Cream: This is the primary ingredient for making butter. It should contain a high milkfat content, typically around 36% or more. I use Woolies Thickened Cream and often get it when it’s discounted, near its due date. The cream must be cold before whipping.
- Cultures: You’ll need a bacterial culture to ferment the cream. A popular choice is yogurt These cultures contain beneficial bacteria that will acidify the cream during fermentation.
- Salt (optional): If you want to make salted cultured butter, you can add salt to the cold water in the final wash. The amount of salt is a matter of personal preference.
- Water: Used to wash the butter, this needs to be really cold.
That’s it! These are the basic ingredients needed to make cultured butter. The process involves culturing the cream with the yogurt, mixing it to separate the butterfat from the buttermilk, and washing it in cold water (salted if desired).
Storing
Storing homemade cultured butter is important to maintain its freshness and prevent it from spoiling.
- Refrigeration: Homemade cultured butter should be stored in the refrigerator, or a small amount kept cold cool in a butter bell. Use an airtight container or wrap it tightly in plastic wrap or parchment paper to protect it from air and moisture. This will help prevent the butter from absorbing odours and flavours from other foods in the fridge.
- Salted vs. Unsalted: If you’ve made salted cultured butter, it may have a longer shelf life than unsalted butter because salt acts as a preservative. However, both types of butter should be kept cold.
- Labelling: If you’ve stored the butter in a container, it’s a good practice to label it with the date it was made. This way, you can keep track of its freshness.
- Freezing: If you have made a large batch and don’t plan to use it all within a few weeks, you can freeze homemade cultured butter. Wrap it tightly in plastic wrap or aluminum foil, place it in an airtight container or freezer bag, and store it in the freezer. Frozen butter can be stored for several months.
- Avoid Cross-Contamination: Be mindful not to introduce foreign substances or contaminants into the butter when scooping it out or handling it. Use clean utensils and hands.
- Check for Spoilage: Occasionally check the butter for any signs of spoilage, such as off odors, mold growth, or changes in texture. If you notice any of these signs, discard the butter.
Homemade cultured butter, like store-bought butter, can stay fresh for several weeks in the refrigerator and several months in the freezer if stored properly. However, its shelf life may vary depending on factors like temperature, exposure to air, and how well it was handled during the butter-making process. Always use your best judgment and your senses (smell and taste) to determine if the butter is still good to use.
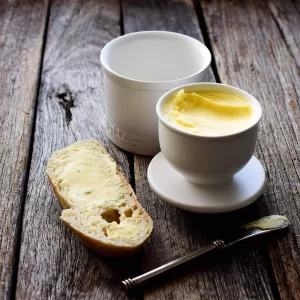
Butter Bell
Yes, you can store cultured butter in a butter bell. These are available from theMix Shop. A butter bell is a traditional way to keep butter fresh at room temperature while preventing it from becoming rancid or spoiled. It consists of two parts: a lid and a base. Here’s how it works:
- Fill the Base: Fill the base of the butter bell with a small amount of very cold water, typically around 2.5cm deep.
- Pack the Butter: Pack the cultured butter into the lid of the butter bell. Make sure it’s well-shaped and compacted.
- Assemble the Butter Bell: Place the lid with the butter into the base containing water.
- Store at Room Temperature: The water in the base creates an airtight seal when the lid is placed upside down, which helps keep air out and prevents the butter from spoiling. Store the butter bell on your kitchen countertop at room temperature.
By using a butter bell, you can enjoy the convenience of having softened, spreadable butter readily available without the need for refrigeration. However, it’s essential to change the water in the base regularly, typically every day and f its a hot day, twice in a day, to ensure freshness and prevent mould growth.
Just remember that while butter can be stored at room temperature in a butter bell, this method works best for small amounts of butter that you’ll use within a week. If you have a larger quantity of butter or won’t use it quickly, it’s still advisable to store the excess in the refrigerator or freezer to extend its shelf life.
Buttermilk
Store in the fridge for 1 -2 weeks or in the freezer for up to 3 months. I like to freeze in ice cube tyrays and once frozen tip into a sealed bag. That way I can take out exactly what I need. Search ‘buttermilk’ in the search bar of Cookidoo for some great recipes!
Cultured Butter
Equipment
- TM5 or TM6
- Large bowl & sieve
Ingredients
- 600 grams cream thickened or pure
- 70 grams yogurt Greek or similar
- 500 grams water icy cold
- 2 tbsp salt Optional
Instructions
- Add cream and yogurt to Thermomix bowl and heat to 37℃ at speed 2, (this will take around 2 mins. Tip cream mix into a bowl and cover. Leave at room temperature for around 8 hours or overnight to ferment.
- After this time, place in the fridge to chill down for a couple of hours.
- Insert the butterfly into the Thermomix bowl. Add the cold cream and yogurt mix. Mix until the butter solids have separated from the buttermilk. (This can take 2 – 4 mins at speed 4, depending on how cold your cream mix is). Listen to the Thermomix and keep an eye on things through the hole in the lid. When liquid starts splashing, you know you are done.
- When separated, pour the mix through a sieve, keeping the buttermilk (the liquid) to use later on something else. Remove the butterfly from the bowl.
- Return solids to the Thermomix bowl with the cold water and salt. RemWash by mixing (without the butterfly) for approx 6 seconds at speed 4.
- Drain well through sieve; getting out as much liquid from the butter solids as possible, but not forcing the butter through the holes/
- Shape the butter and keep cold in a butter bell, fridge or freezer.